
In this second part of my AWS VPC series, I will explain how to create an Internet Gateway and VPC Route Tables and associate the routes with subnets. Then, I’ll show you how to create Network Access Control Lists (NACLs) and Rules, as well as AWS VPC Security Groups.
Jason Coltrin
Jason Coltrin has been working in IT for more than 17 years. He holds an MCSE 2003 Security+ plus various Palo Alto and SonicWall firewall certifications. He also is an avid Linux Administrator and currently works in higher education.
Latest posts by Jason Coltrin (see all)
In the previous article, we provided an overview of Amazon AWS VPC security, created an initial VPC, and built two subnets. We now have a good foundation for moving into the core of a Virtual Private Cloud on the Amazon AWS platform. If you haven’t already done so, go back to the first article in the series and make sure you’ve caught up for the following steps.
Create an AWS VPC Internet Gateway ^
We want to provide our upcoming instances with a way to get out to the Internet by creating an Internet Gateway (IGW). If you would like to learn more about VPC Internet Gateways, you can find an informative document here.
In the VPC Dashboard, click on Internet Gateways, followed by Create Internet Gateway. Provide the Name tag with something similar to IGW-4sysops, and then click Yes, Create.

Create Internet Gateway
After we create the IGW, you will see that the state of the IGW is detached. So, we now need to attach a VPC to our new IGW. Do this by clicking on the Attach to VPC button, select the VPC you created previously (4sysopsVPC), and then hit Yes, Attach.

Attach IGW to VPC
Create AWS VPC Routes ^
Now that we have our Internet Gateway attached to our Virtual Private Cloud, we want to create some route tables. We’ll define two Route Tables, as shown in red in the following diagram. The first will be a Public Route Table from the Public-Subnet to the IGW, which will allow our Public-Subnet to reach the Internet. The second route will be a Private Route Table that will allow both our Public and Private subnets to communicate with one another.

Public and private route table diagram
To create our first Public Route Table, go to the VPC Dashboard, then click on Route Tables > Create Route Table. Provide the Name Tag: Public-Route, select the 4sysops VPC, and then click Yes, Create.

Create public route table
Next, with the Public-Route selected, click on the Routes tab and click Edit.

Edit public routes
Click Add Another Route for traffic going outside of our VPC.
Enter the following: Destination: 0.0.0.0/0 target: igw: 4sysops, and then click Save.

Create public route
The 0.0.0.0/0 subnet says that any traffic not bound for our local network will go out the Internet Gateway.
Next, we need to associate the Public-Route with our Public-Subnet. With Public-Route selected, click on the Subnet Associations tab, click Edit, place a checkmark next to the 10.0.1.0/24 | Public-Subnet, and then click Save.

Create Public Subnet Public Route association
In addition to the Public-Route Table, we now want to create a Private-Route Table. So, again, go to Route Tables > Create Route Table. Provide the Name Tag: Private-Route, select the 4sysops VPC, and then click Yes, Create.
There is no need to edit or add any additional routes under the Route Tab for the Private-Route. This is a private route only within our VPC, so all traffic is okay to communicate with any other subnet inside 10.0.0.0/16. However, we do need to associate the Private-Route with our Private-Subnet. To do this, again,with the Private-Route selected, on the Subnet Associations tab, click Edit, place a checkmark next to the 10.0.2.0/24 | Private-Subnet, and then click Save.

Create Private Subnet Private Route association
When we’ve created our Route Tables, we should see the following tables listed, as well as an explicit subnet association for each of them (Public-Route to Public-Subnet and Private-Route to Private-Subnet):

Completed Route Tables
Create AWS VPC Network Access Control Lists and Rules ^
Next, we’ll create our Network Access Control Lists: Private-NACL and Public-NACL. If you’re unfamiliar with NACLs, they are similar to Security Groups in that you can shape traffic defined by rules. Unlike Security Groups, NACLs operate at the subnet level and are stateless, whereas Security Groups operate at the instance level and are stateful. You can find some useful information about NACLs here and how they compare to Security Groups here. I found the following diagram helpful in regard to NACLs.

NACL vs. Security Group diagram
In the main VPC menu, go to Security > Network ACLs > Create Network ACL, add the Name tag: Private-NACL, select the 4sysops VPC, and then click Yes – Create.
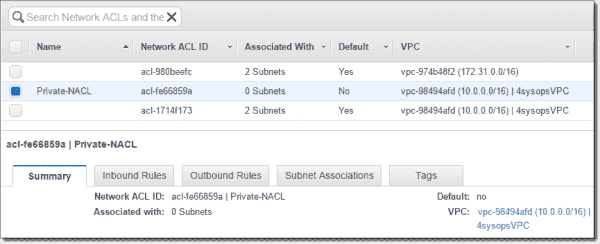
Create network ACL Private NACL
Create a new inbound rule by first clicking on the Inbound Rules tab and then Edit. Add Rule # “100” > All TCP coming from Public-Subnet source 10.0.1.0/24, we select Allow and then Save.

Create Private NACL inbound rule
Because NACLs are stateless, do the same in the Outbound Rules: ALL TCP destination: 10.0.1.0/24 Allow (Public-Subnet).

Create Private NACL outbound rule
Next, go to the Subnet associations tab and associate the Private-NACL with the Private-Subnet.

Private NACL and Private Subnet association
So, now our Private-NACL has a traffic policy with our Public-Subnet, within our VPC, and is associated with our Private-Subnet.
We will now essentially replicate our Private-NACL to a new Public-NACL, with similar rules.
In the main VPC menu, go to Security > Network ACLs > Create Network ACL, add the Name tag: Public-NACL, select the 4sysops VPC, and then click Yes – Create.

Create network ACL Public NACL
Again, create a new inbound rule for the Public-NACL. However, since I will be managing this network from my home computer, I will want to allow all TCP traffic from my external IP address. Replace this address with your own external IP address.
Edit > Rule #: 100, Type: All TCP, Protocol TCP (6), Port Range: ALL, Source: x.x.x.x/32, Allow/Deny: ALLOW. > Save. Doing this creates a rule to allow traffic coming from my IP address with a /32 CIDR to access the Bastion instance. If you wanted to, you could limit this to just port 22 or 3389 for remote administration.

Create Public NACL inbound rule
Add another rule for the Private-Subnet to communicate with the Public-Subnet.
Inbound Rules > Edit / Add another rule > Rule #: 200, Type: All TCP, Protocol TCP (6), Port Range: ALL, Source: 10.0.2.0/24, Allow/Deny: ALLOW > Save.

Create Public NACL inbound Private Subnet rule
Similar to our inbound rules, because we are modifying stateless connection traffic, we need to do the same for outbound traffic.
Outbound Rule tab > Edit > Rule #: 100, Type: All TCP, Protocol TCP (6), Port Range: ALL, Source: x.x.x.x/32, Allow/Deny: ALLOW. > Save
Outbound Rule tab > Edit > Rule #: 200, Type: All TCP, Protocol TCP (6), Port Range: ALL, Source: 10.0.2.0/24, Allow/Deny: ALLOW. > Save

Create Public NACL outbound rules
We’ll now associate the Public-NACL to the Public-Subnet by clicking Subnet Associations > Edit and select Public-Subnet > Save.

Associate Public NACL with Public Subnet
Now we have our NACLs set up to allow all TCP traffic to and from our home IP address to the Public-Subnet and, also, all TCP traffic between the two subnets is allowed.
Create AWS VPC Security Groups ^
Here, we’ll create two Security Groups for the instances which we will create shortly. Go to VPC Dashboard > Security > Security Groups > Create Security Group > Name tag: Public-SG, Group name: Public-SG, Description: To be used by the bastion instance, VPC: 4sysopsVPC.

Create Public SG security group
Along the same lines as the other security measures, we’ll create a second security group named Private-SG.
Go to VPC Dashboard > Security > Security Groups > Create Security Group > Name tag: Private-SG, Group name: Private-SG, Description: Used for private instances, VPC: 4sysopsVPC.
Next, we’ll configure the inbound rules for the Security Groups, and we’ll narrow down the traffic to just the management protocols we’ll use to access the instances. First, we’ll start with the Private-SG and go to the Inbound Rules tab > Edit > Type: SSH (22) Protocol: TCP (6) Source: Public > Save. Creating this rule will allow port 22 from the public security group to access the private security group.
For the Public-SG inbound, we want SSH traffic coming from the Private-SG and also SSH coming from my IP address. Public-SG > Inbound Rules tab > Edit > Type: SSH (22) Protocol: TCP (6) Source: x.x.x.x/32. > Save.

Public SG inbound rules
With the majority of our work complete, our next article in the three-part series here will show how to create two AWS instances in our VPC, how to securely connect to the Bastion instance, and, finally, how to use Pageant and SSH to connect through our Bastion host to our Private Instance.

 (No Ratings Yet)


